

How to Get Google Assistant on Lollipop Devices (No Root)
Google Banana is past far the best voice assistant available today, period. We have already compared information technology to other voice administration like Siri and Hound and every time it has come out as a winner. Information technology's ability to comport out long conversational dialogues and impeccable contextual awareness is unmatched. Google Assistant is one of the biggest advantages Android has over its arch rival, the iOS. That's why it was so heartbreaking to come across Google Assistant being launched for iPhone users, while the Android users beneath Marshmallow (6.0) lay in await. However, the Android customs is strong and unrelenting. Today, we are going to share a method using which y'all can install and use Google Banana on your Android Lollipop device and that too without rooting your smartphone.
We are going to encompass ii different methods which you can apply to install the Google Assistant on your device. The showtime method is easier, however, it might not work on some devices. The second method is a little fleck longer only will piece of work on every Android Device running Android 5.0 or 5.1 Lollipop. Both the methods work on non-rooted devices.
Get Google Assistant on Lollipop Via APK File
Annotation : I have used Moto G3 running Android 5.ane (Lollipop) for this process. Yous can use any device, the only requirement is that the device should be running on Android Lollipop. To enable Google Assistant on Android 6.0 or higher, you lot can check out our other commodity on the same.
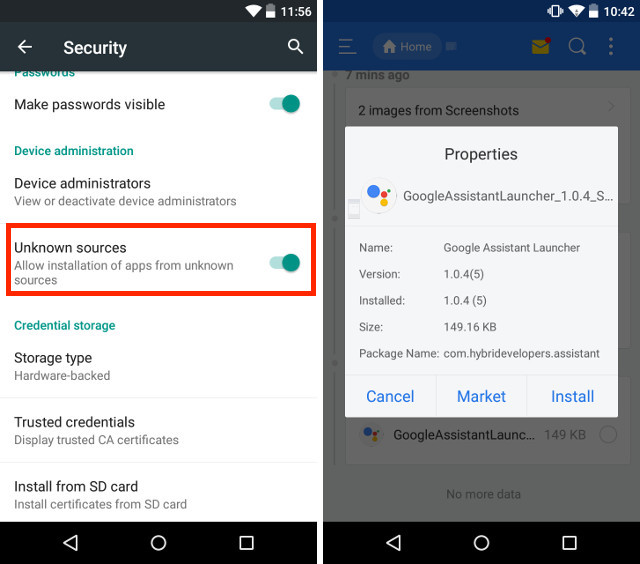
i. Firstly, go ahead and download the Google Banana APK. Make sure y'all accept allowed the installation of apps from "Unknown Sources" in Settings->Security. Then, open up the APK file and install the Google Assistant app on your Lollipop-running smartphone.
two. Then, only launch the app and go to the "Your Stuff" tab and printing "Add Reminder". This might seem like an capricious step, just information technology is important, hence practise not skip information technology.

Note : Make sure to update the Google app to latest version, otherwise the Google Assistant app won't piece of work.
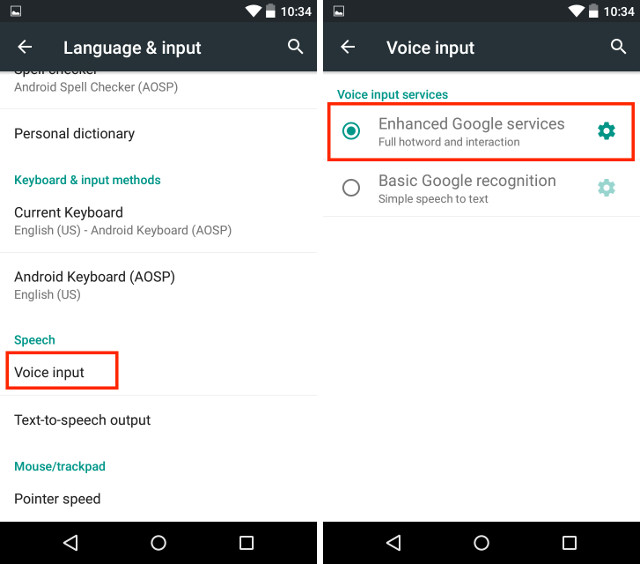
three. Now nosotros need to make Google Assistant your default vocalism input method. Equally you know, Android 5.0 comes with Google Now, and so we need to make a change and make Google Assistant your default voice assistant. To do that, open the Settings folio then caput toLanguage & input->Voice input and choose "Enhanced Google Services".
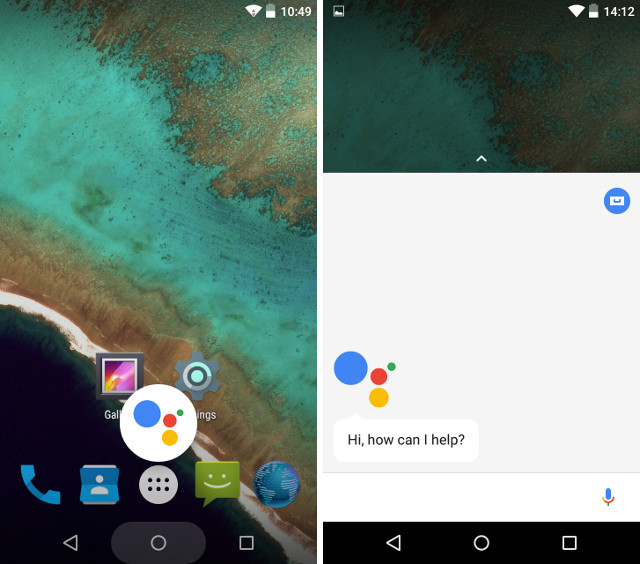
iii. At present, long press the home push button and select Google Assistant as your default program. That's it, you can enjoy Google Assistant on your phone and activate it through the home button.
This method should work for almost all the devices. Withal, some phones like older Samsung smartphones might encounter problems while launching the Google Banana. In that case, y'all can use the following alternating method.
Alternating Method – Using the Nova Launcher
1. First, install the Nova Launcher (free) on your device, or any launcher that lets you add together action shortcuts on the home screen and set it as your default home screen. Then, install the Google Assistant APK, like we did in the previous method.
2. And so, long printing on the home screen to open up the widgets panel and in the Nova Launcher widgets, add "Activities".

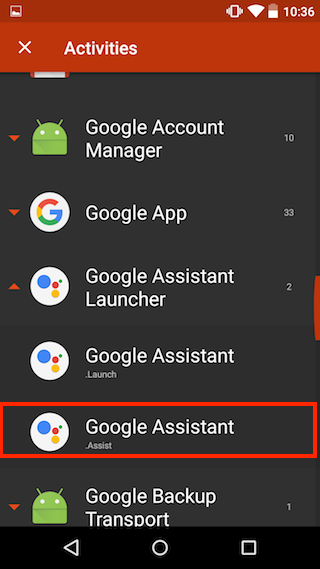
2. An Activities page will open up upward. Here, scroll down till you find the Google Assistant Launcher and tap on it. You volition run across two options,select the 1 with ".Assistance" in the subtext.
3. In one case the shortcut is created, tap on it to launch the Assistant app. Now, just add a reminder and make Google Assistant your default vocalisation input, as we showed earlier in the commodity. Likewise, long printing the home button to select Google Assistant as your default vocalization assistant.

In some rare cases, you still can not launch the Google Banana with the home button shortcut. Use the shortcut we just created instead to launch the Google Assistant.
Run into As well: How to Install Google Banana on Windows, macOS and Linux
Relish the Google Assistant on Lollipop
Google Assistant brings the smarts to your smartphone. The more yous use information technology, the more you lot will fall in love with it. We have covered several Google Assistant tips and tricks in our previous articles. Check them out to get the about out of your Google Banana. Likewise, practice let us know in the comment section below your thoughts about the Google Banana. We e'er hang out in the annotate section, if y'all still have any query, feel free to ask.

Source: https://beebom.com/how-get-google-assistant-lollipop-no-root/
Posted by: scotttrall1987.blogspot.com
0 Response to "How to Get Google Assistant on Lollipop Devices (No Root)"
Post a Comment